Ultimate Taco Dip Guide: Layering Secrets for Firm, Flavorful Fun
Imagine the perfect party appetizer: a vibrant, multi-layered taco dip, brimming with zesty flavors and fresh textures. Now imagine plunging a sturdy tortilla chip into that masterpiece, only to pull it back dripping with a watery, separated mess. We’ve all been there, staring down a "weeping" dip that looks more like soup than a snack. The secret to a truly great taco dip isn't just about the spices you use; it's about mastering the art of layering and, crucially, moisture management. This comprehensive guide will reveal the ultimate layering secrets for a firm, flavorful, and structurally sound taco dip that stands tall from the first whistle to the final scoop, becoming the undisputed star of any gathering.
A professional-grade appetizer should be a structural marvel, offering a clean, creamy break with every single scoop. Our focus today is on an "Anti-Soggy Bottom" philosophy, ensuring your creation remains firm and impressive for hours on end, even on a busy buffet table. By understanding the physics of layering and paying close attention to specific ingredients and temperatures, you can transform your taco dip from a potential puddle into a palate-pleasing paragon of party perfection.
The Core Problem: Why Most Taco Dips Go Soggy (and How to Fix It)
The dreaded soggy taco dip is a common culinary catastrophe, often leading to disappointment and wasted ingredients. The culprit? Primarily, two factors: uncontrolled moisture migration and temperature clashes. Most traditional recipes inadvertently create a perfect storm for liquid from salsa and meat to seep down, turning the creamy base into a watery, unappetizing puddle. It’s like building a house on quicksand – eventually, it’s going to sink.
The "physics of layering" might sound intimidating, but it boils down to simple principles. When warm ingredients meet cold, dairy-rich components, the fats in the dairy begin to separate, and the emulsion breaks. This leads to a greasy, watery consistency that can quickly compromise the entire dip. Moreover, loose, watery layers, rather than thick, bound ones, simply lack the structural integrity needed to support the weight of the toppings above. To achieve a taco dip that stays firm for four hours or more, you must prioritize ingredient density, meticulous moisture removal, and precise temperature control. This attention to detail in the prep phase is what separates a good taco dip from a truly spectacular one.
Building Your Masterpiece: The "Anti-Soggy" Layering Secrets
Foundation First: The Creamy, Sturdy Base
Your dip's structural integrity begins with its foundation. This creamy base is the anchor that holds everything together, so it needs to be robust. For the best results, always reach for full-fat cream cheese. While low-fat versions might seem healthier, they lack the saturated fat content essential for providing that critical structural "set" when mixed with other ingredients. You want a base that feels heavy and substantial, not airy or whipped.
- Room Temperature Cream Cheese: Before mixing, ensure your cream cheese is softened to room temperature. This makes it easier to beat into a smooth, lump-free consistency with the sour cream.
- Sour Cream Selection: Pair your full-fat cream cheese with a good quality, full-fat sour cream. Greek yogurt can be a lighter alternative, but be mindful of its slightly tangier flavor and potentially thinner consistency.
- Seasoning: Thoroughly mix in your taco seasoning. A generous amount ensures a flavorful base that won't be overwhelmed by subsequent layers. Consider making your own taco seasoning blend for customized flavor and less sodium.
- Chill for Stability: Once mixed, spread your creamy base evenly into your serving dish. For optimal firmness, we recommend chilling this layer for at least 30 minutes before adding the next components. This helps it firm up and creates a stronger barrier against moisture.
Mastering the Meat Layer: Lean, Flavorful, and Cool
The meat layer, often the heart of the savory experience, is also one of the biggest culprits for a soggy dip if not handled correctly. Excess grease and heat are your enemies here.
- Lean Ground Beef is Key: Head to the grocery store and opt for the leanest ground beef available, ideally 90/10 or 93/7. While fat equals flavor in a burger, in a layered dip, excess grease will inevitably become an unsightly, oily slick pooling at the bottom of your dish. If you're using ground turkey, ensure it's equally lean.
- Drain Meticulously: After browning your seasoned ground beef, drain every last drop of fat. You can even use paper towels to blot away any residual grease. This step is non-negotiable for an "anti-soggy" dip.
- Temperature Control is CRITICAL: This is perhaps the most important rule. The meat layer MUST be completely cooled to room temperature or even chilled before it touches your dairy base. Adding warm meat to cold cream cheese will instantly break down the dairy's emulsion, leading to separation and a watery mess. Spread the cooked meat thinly on a baking sheet to speed up the cooling process before gently spooning it over the chilled cream cheese layer.
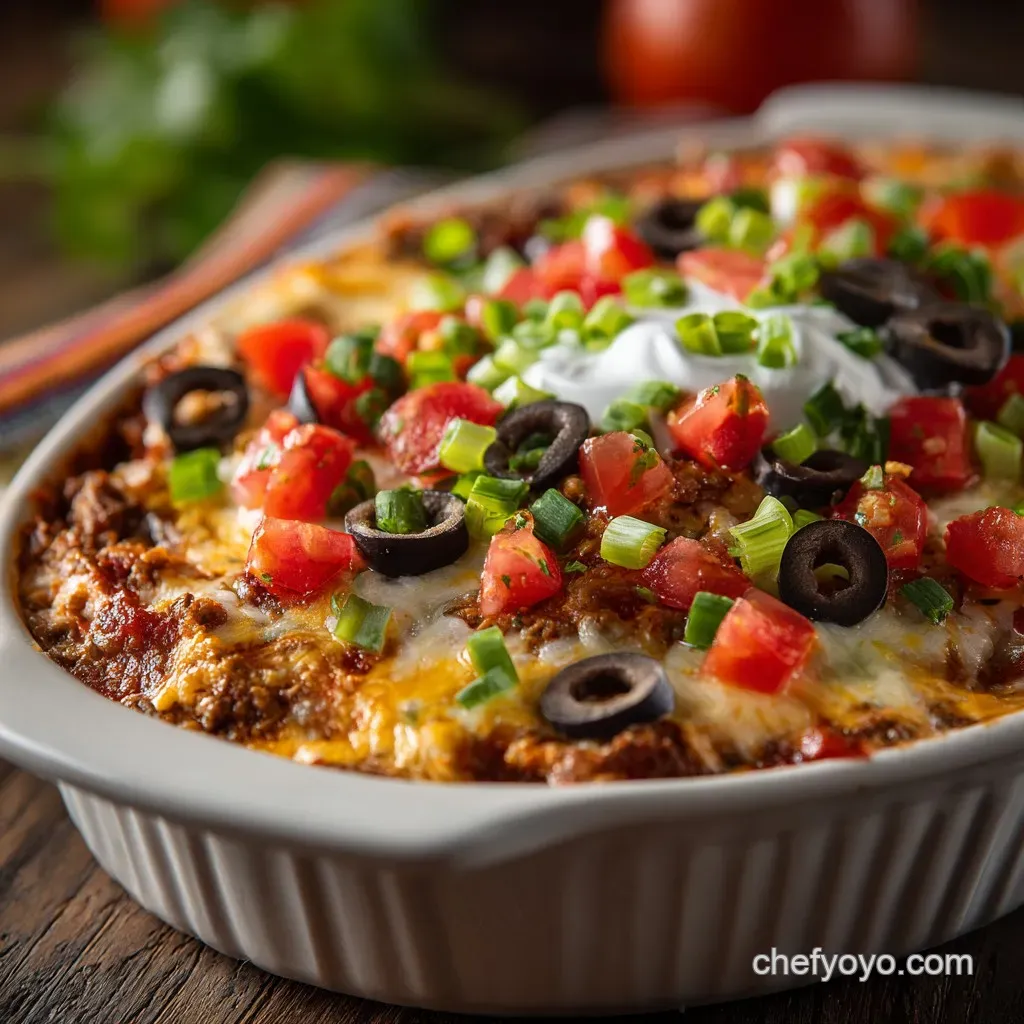
Strategic Toppings: Preventing the Seepage
The final layers are where the vibrant colors and fresh crunch come into play. Smart preparation here will keep your dip crisp and prevent moisture from migrating downwards.
- Salsa Savvy: Choose a thick, chunky salsa. If your preferred salsa seems watery, pour it into a fine-mesh sieve and let it drain for 15-20 minutes before adding it to the dip. This simple step makes a huge difference.
- Grate Your Own Cheese: For superior texture and melt, always grate your own cheese from a block. Pre-shredded varieties often contain anti-caking agents like cellulose, which can prevent smooth melting and affect the overall texture of your dip. Sharp cheddar provides a robust flavor that cuts through the richness, but a blend of Monterey Jack and Colby works beautifully too.
- Veggie Prep Matters:
- Tomatoes: Dice them finely and, critically, pat them dry with paper towels to remove excess moisture before scattering them over the dip.
- Olives & Jalapeños: Ensure any canned ingredients are thoroughly drained.
- Lettuce: Shred or finely chop crisp iceberg or romaine lettuce. Add this as one of the very last layers, just before serving, to prevent wilting and maintain its crunch.
- Other Toppings: Consider adding thinly sliced green onions, a sprinkle of fresh cilantro, or even a dollop of guacamole (mixed with a little lime juice to prevent browning) on top for extra flair.
Beyond the Basics: Elevating Your Taco Dip Experience
Once you've mastered the anti-soggy method, the possibilities for customization are endless. A great taco dip is not just about structure; it's also about building dynamic, unforgettable flavor profiles.
- Flavor Boosters: Don't hesitate to experiment with your taco seasoning blend. Add a pinch of smoked paprika for depth, a dash of cayenne for a kick, or a hint of cumin for earthiness. A layer of seasoned, room-temperature refried beans can also add another dimension of flavor and creaminess beneath the meat layer.
- Presentation Perfection: A clear glass dish allows your beautiful layers to shine through, making for an appealing centerpiece. Garnish generously with fresh cilantro, a few extra olives, or even a sprinkle of crumbled tortilla chips around the rim for visual appeal.
- Chip Choice: Pair your firm, flavorful dip with sturdy tortilla chips that can handle a generous scoop without breaking. Thick-cut white or yellow corn tortilla chips are ideal. Even hearty veggie sticks like bell pepper strips or cucumber slices make excellent, healthier dippers.
- Make-Ahead Mastery: Most of your prep, especially cooking and cooling the meat and preparing the creamy base, can be done a day in advance. Assemble the dip several hours before serving and keep it chilled. Add delicate toppings like lettuce and fresh tomatoes just before guests arrive to maintain peak freshness and crunch.
This easy taco dip recipe brings back so many memories for me because it’s actually one of the very first recipes I ever learned to make. My mom used to make it for parties all the time, and I was always right there beside her, helping mix the cream cheese and sprinkle on the toppings. It felt like such a big deal at the time, and it truly is a big deal to serve a dip that everyone loves and talks about for all the right reasons!
Conclusion
Creating the ultimate, firm, and flavorful taco dip is truly within your reach. By embracing the "Anti-Soggy Bottom" philosophy and focusing on meticulous temperature control, thorough draining, quality ingredients, and strategic layering, you can say goodbye to watery disappointments forever. This small investment of time and attention to detail during preparation pays off immensely, yielding a structurally magnificent, taste-bud-tempting appetizer that will impress at any potluck, game day, or backyard barbecue. So go forth, layer with confidence, and enjoy the delicious fruits of your perfectly engineered labor!
